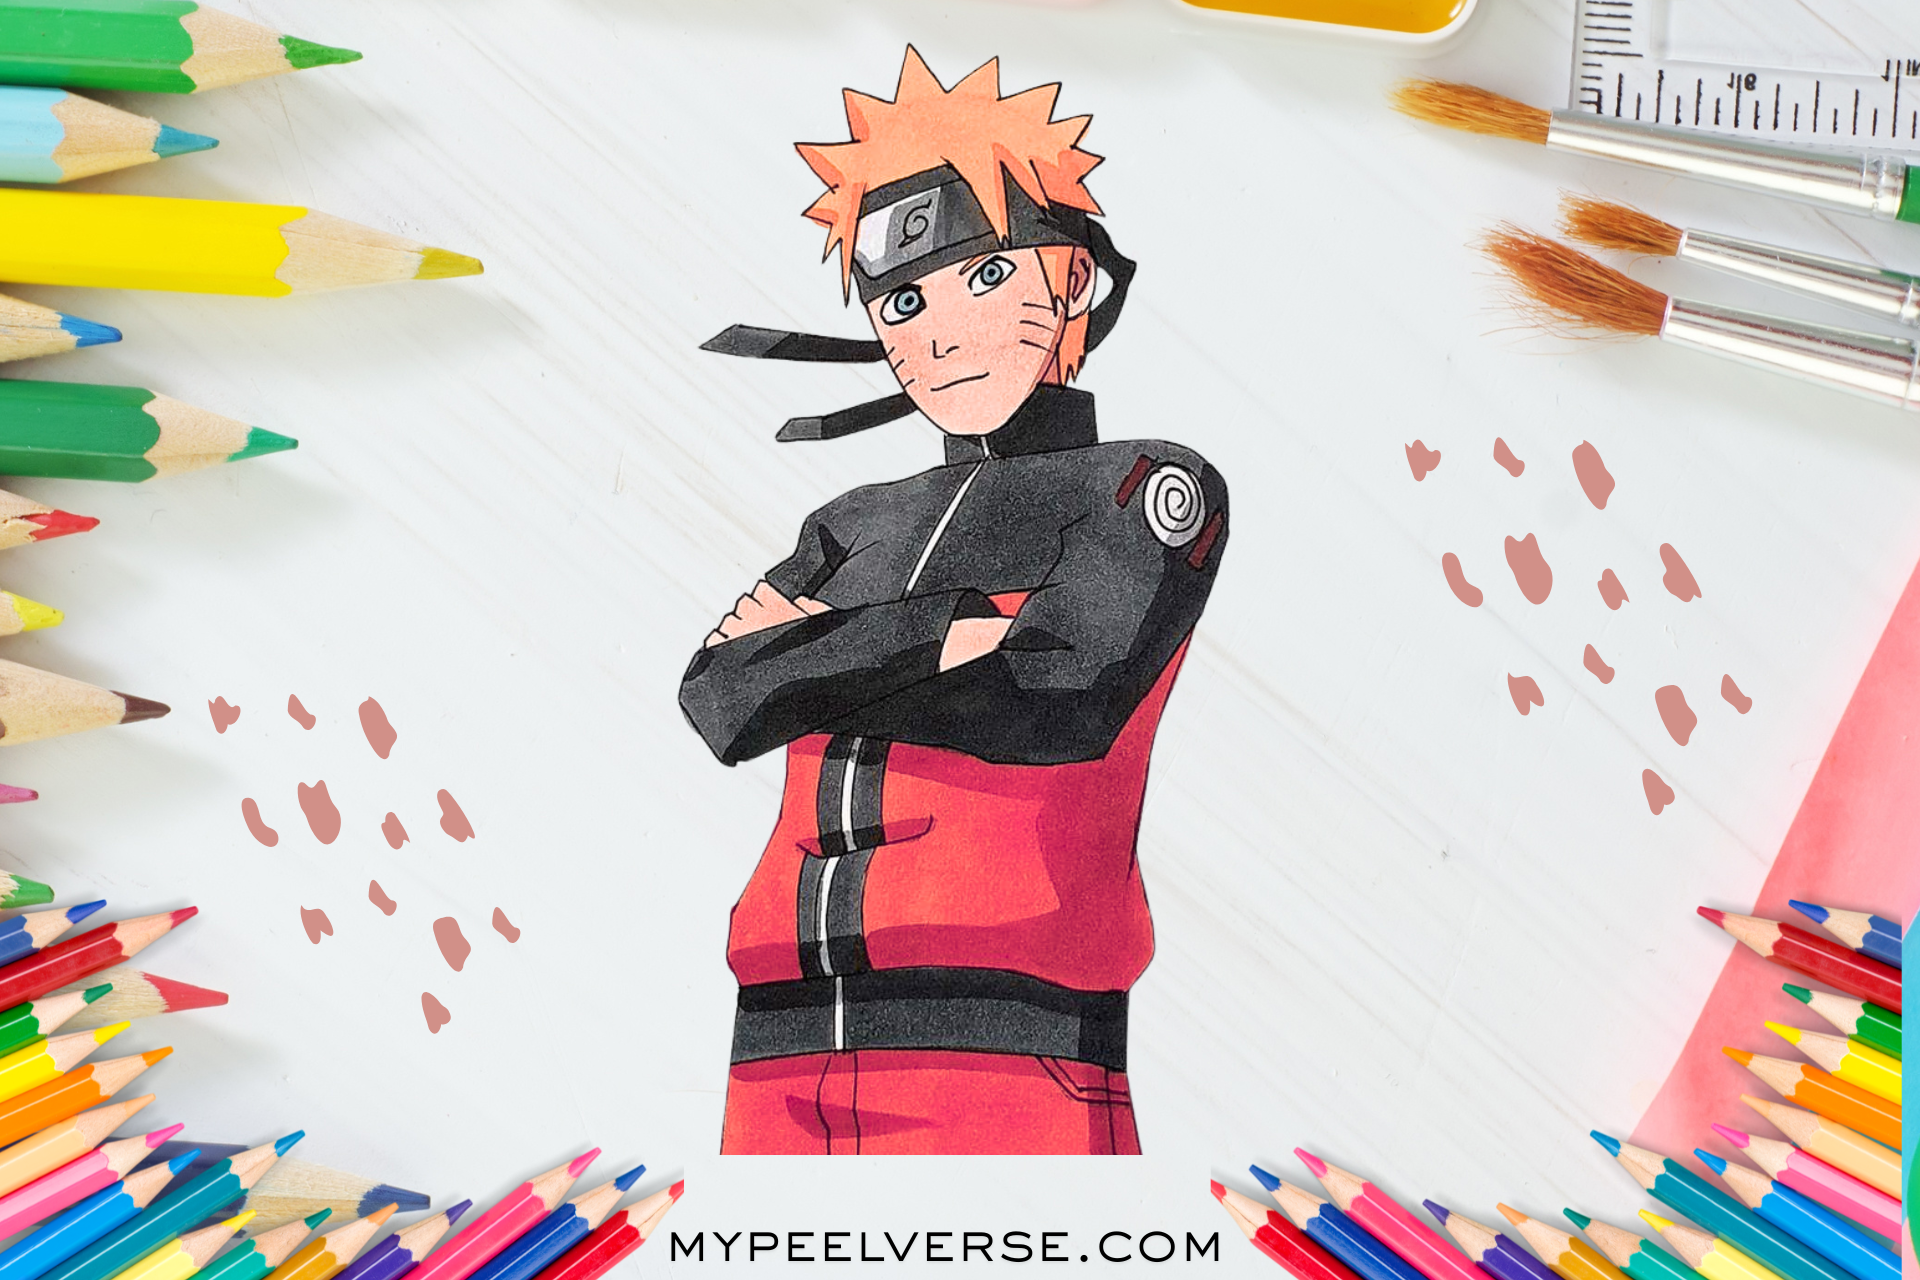
How to Draw Naruto Uzumaki Step-by-Step Guide for Beginners
Bring the Spirit of Naruto to Your Sketchbook
Few anime characters are as instantly recognizable or as rewarding to draw as Naruto Uzumaki. If you’ve always wanted to learn how to draw Naruto Uzumaki from scratch, this guide will walk you through every step.
But here’s the truth: drawing Naruto is not as simple as copying a picture. His design looks clean, but it’s full of subtle proportions, stylized anatomy, and emotion-driven details. If your last attempt made Naruto look more like a tired Pikachu than a ninja hero you’re not alone.
This guide changes that.
By the end of this tutorial, you’ll know how to:
Build Naruto’s face and body with accurate proportions.
Capture expression and energy (not just outlines).
Ink, color, and shade your drawing for a professional finish.
Fix 10 common beginner mistakes instantly.
Whether you draw traditionally or digitally, this 2025 beginner guide walks you through everything step-by-step just like a sensei guiding a young ninja through training.
Why Drawing Naruto Feels Tricky (Even for Beginners)
On the surface, Naruto’s design seems simple: round eyes, whisker marks, spiky hair, orange outfit. But that simplicity hides precision.
- His eyes are large and rounded but slightly angled giving him both innocence and determination.
- His face shape changes subtly across series versions (younger Naruto vs Shippuden vs Hokage).
- His hair spikes aren’t random; they follow perspective and direction.
- His headband’s curve changes with every tilt of the head.
Most beginners struggle because they focus on copying details before mastering structure. The secret? Draw Naruto’s underlying framework first the guidelines, axes, and symmetry lines that ensure his features stay balanced. Once you understand those basics, the rest flows naturally.
Pro Insight: Don’t just “draw Naruto.” Learn to “construct” him. Artists who master construction find every anime character easier later from Sasuke to Goku.
Tools & Materials Traditional and Digital (2025 Update)
Before starting, let’s make sure your ninja toolkit is ready.
Traditional Setup (Recommended for Beginners)
| Type | Recommended Tools | Notes |
| Pencils | Mitsubishi Uni HB–2B, Staedtler Mars Lumograph | Start with HB for sketching, use 2B for darker lines. |
| Erasers | Kneaded Eraser & Precision Eraser | For clean corrections; kneaded eraser lifts graphite without smudging. |
| Fineliners | Sakura Pigma Micron 0.3, 0.5, 0.8 | Smooth ink lines; doesn’t bleed with markers. |
| Markers | Ohuhu Markers (Budget) / Copic Sketch (Pro) | Copic offers blending control; Ohuhu is affordable for beginners. |
| Paper | Smooth Bristol or Marker Paper | Prevents bleeding during coloring. |
Budget Starter Kit (under $60):
- 1 HB pencil
- 1 Micron pen (0.5)
- 1 pack of Ohuhu markers
- A4 Bristol sketch pad
Digital Setup
If you prefer drawing on a tablet:
- Tablet: Wacom Intuos (starter) or Wacom Cintiq / XP-Pen Artist (mid-range).
- Software: Procreate (iPad), Clip Studio Paint, or Krita (free).
- Brushes: Use simple round brushes first, avoid textured ones until confident.
- Layer Setup:
- Layer 1: Construction lines
- Layer 2: Final clean lines
- Layer 3: Color base
- Layer 4: Shadows & highlights
- Layer 1: Construction lines
Pro Tip: Keep all your guides and base shapes on a separate layer. You can reduce opacity or hide them easily when moving to inking.
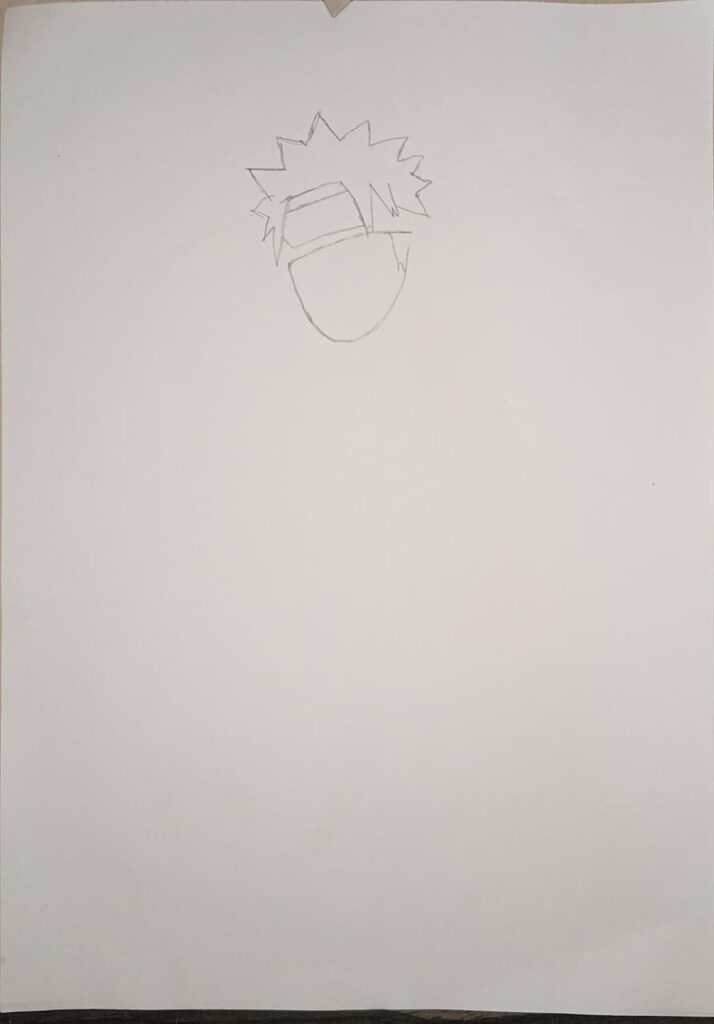
Step 1: Constructing Naruto’s Head (Front View)
Let’s start with the foundation of the face.
Step 1: Draw a circle.
This forms the skull. Add a faint vertical center line and a horizontal eye line slightly below the center.
Step 2: Extend the jawline.
From both sides of the circle, draw two diagonal lines inward. Connect them with a rounded chin. Naruto’s face is softer than an adult’s.
Step 3: Mark the eyes.
Divide the face into fifths. The eyes occupy the second and fourth segments. Naruto’s eyes are wide, slightly rounded rectangles with a single eyelid crease.
Step 4: Add the nose and mouth.
- Nose: small, just a hint of shadow halfway between eye line and chin.
- Mouth: slightly above halfway from nose to chin; curve upward into a confident smirk.
Step 5: Draw the ears.
Align them with the eye line (top) and the nose (bottom).
Step 6: Place the whisker marks.
Three curved lines on each cheek, slightly angled. They shouldn’t be parallel and follow the cheek curve.
Step 7: Add the headband.
Draw a horizontal band wrapping around the head, just above the eyebrows. Remember: it curves slightly because it’s cylindrical around the forehead.
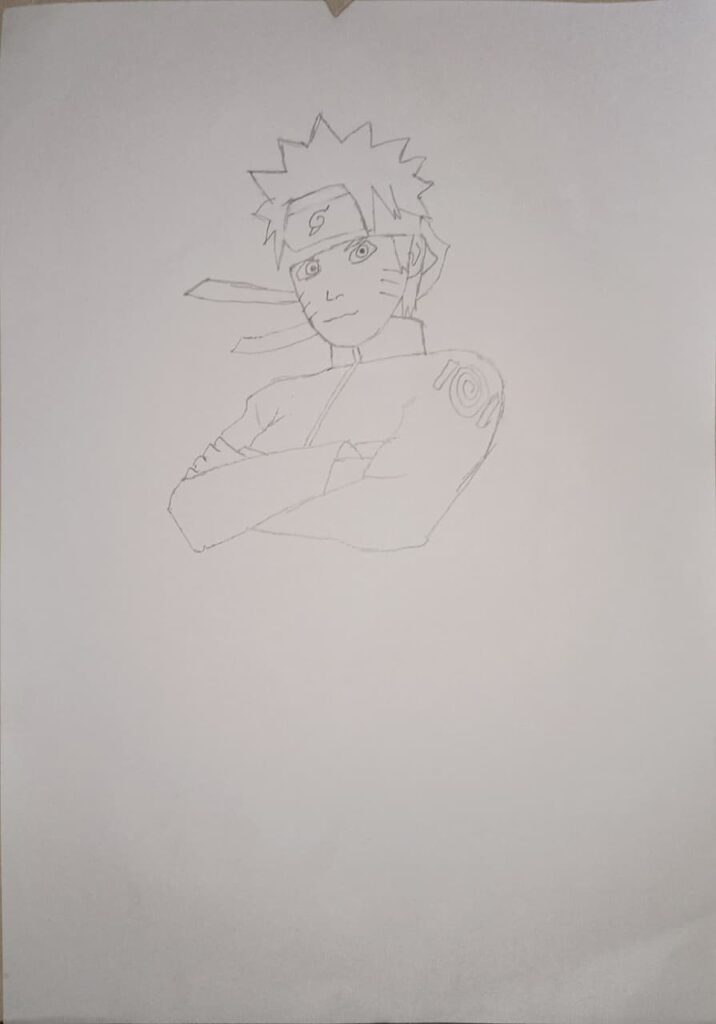
Once you finish these steps, you’ll have Naruto’s core structure ready. Don’t worry about hair yet, that’s the next step.
Common Fix: If Naruto’s face looks too long, you probably placed the eye line too low. Move it up and shorten the jawline.
Step 2: The ¾ View and Tilt
Drawing Naruto from a ¾ angle (the most dynamic and popular pose) gives depth and realism to your art.
Step 1: Start with a slightly squashed circle — the near side is wider.
Draw a center line that curves toward the far side.
Step 2: Keep one eye slightly smaller.
This creates perspective: the farther eye should be about 80% the width of the closer one.
Step 3: Rotate the headband’s curve.
The plate now tilts and wraps its key to the sense of motion.
Step 4: Shift the jawline.
The far side jaw disappears slightly under the cheek; keep the near jaw sharper.
Step 5: Adjust whisker marks and ears.
Whiskers should follow the face’s curve, and only part of the far ear is visible.
Pro Tip: When practicing, overlay your ¾ sketch on top of the front-facing one to notice how features shift. This habit trains your sense of 3D space fast.
Step 3: Drawing Naruto’s Hair & Headband Details
Naruto’s hair might look random, but every spike has a rhythm.
1. Start from the headband.
Draw clumps of spikes radiating outward, roughly 7–9 big spikes around the crown. The spikes above his temples point diagonally upward; top spikes go nearly vertical.
2. Keep variation.
Alternate long and short spikes for natural flow. Each spike should taper to a point.
3. Add the side tufts.
These smaller spikes near the ears add volume essential for balance.
4. Outline the headband plate.
It’s a metal rectangle centered on the forehead, slightly curved. Add rivets (small dots) at both sides.
5. Draw the engraved swirl or leaf symbol.
Use soft pressure to avoid pressing too dark. The swirl should sit slightly above the middle of the plate.
6. Add the fabric folds and knot.
At the sides, show where the band ties off or disappears behind hair.
7. Shadow under the headband.
A light curved shadow under the band gives volume and realism.
Beginner Mistake Alert: Most new artists make Naruto’s hair too tall or symmetrical. Keep one side fuller asymmetry adds realism.
Step 4: Capturing Expression & Emotion

Naruto isn’t just about lines, it’s about life. His energy defines him.
Try practicing three expressions:
- Confident grin: Raise one eyebrow slightly and curve his mouth to one side.
- Battle focus: Narrow the eyes, lower the eyebrows, and add tension lines under them.
- Joy: Widen the eyes and open the mouth in a laugh — the whiskers stretch outward.
Every expression changes his features subtly, so focus on emotional storytelling, not perfection.
Expert Tip: Think about why Naruto is feeling that way before you draw. Emotion drives the gesture and gesture drives believable art.
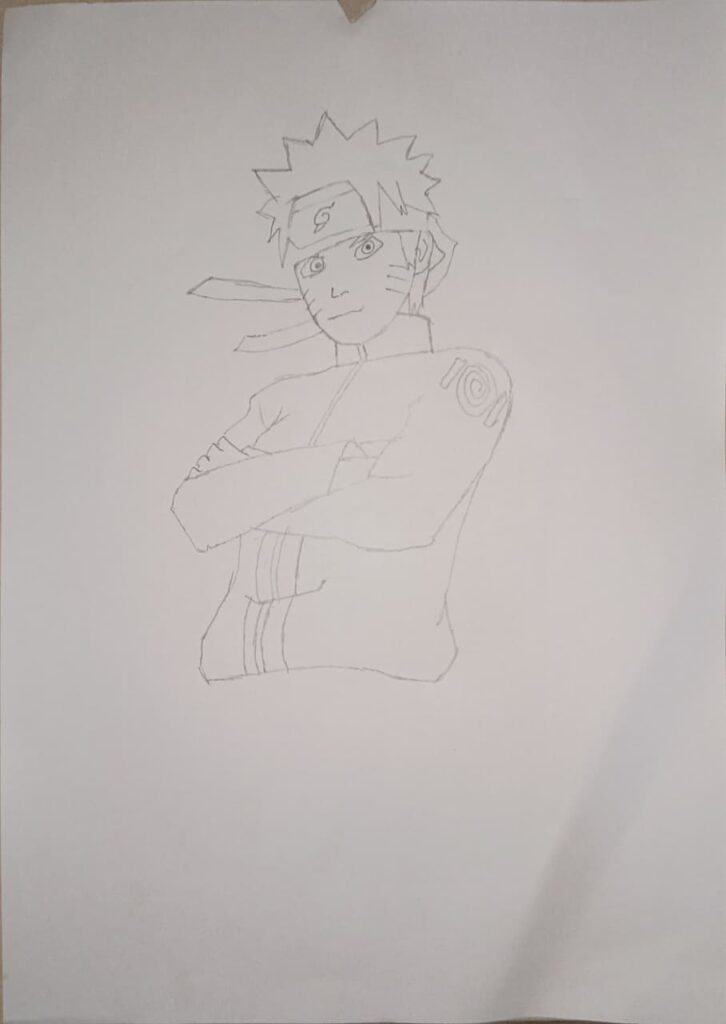
Step 5: Drawing Naruto’s Body and Clothing
Now that you’ve nailed the face and head, it’s time to give Naruto his full form. His body proportions are stylized, not realistic meaning his head is slightly larger compared to the torso than a real human’s.

Basic Body Proportions
- Head to Body Ratio:
Naruto (younger version) = roughly 5.5 heads tall.
Adult Naruto = closer to 6.5 heads tall. - Shoulders:
Width equals about 2 heads across compact, not bulky. - Torso:
The chest narrows toward the waist. Keep posture upright and dynamic. - Hands & Arms:
The fingertips should fall about mid-thigh level. His sleeves are loose, so use soft folds around elbows. - Legs:
Longer and slightly slimmer than realistic human legs. Naruto’s stance often shows readiness to move one leg forward, one back.
Pro Tip: Always draw Naruto’s action line first, a quick curved line from head to foot showing energy direction. It gives motion to every pose.
Clothing Breakdown

Naruto’s outfit looks simple but it’s a masterclass in folds, texture, and personality.
Jacket
- Collar: High and padded, with curved edges that frame the face.
- Zipper: Run down center front, lightly sketch it, don’t make it bold until the final line art.
- Sleeves: Baggy with a slight taper at wrists. Add 2–3 subtle fold lines at elbow bends.
- Symbol: The Uzumaki clan spiral sits on his left shoulder and draws a neat swirl pattern inside a red circle.
Pants
- Straight fit, slightly baggy around knees.
- Cuffs tucked into blue sandals.
- Draw 2–3 folds near knee joints and inner thighs for fabric realism.
Sandals
- Open-toe ninja sandals don’t forget the visible toes!
- Use curved horizontal lines to show strap tension.
Expert Insight: Naruto’s clothing isn’t just design, it tells a story. Early Naruto’s jacket is bright orange (symbol of energy and defiance). Hokage Naruto’s outfit becomes more muted and regal, reflecting growth.
If you want to show evolution, draw three versions of Naruto side-by-side to compare maturity through clothing design.
Step 6: Inking Like a Pro
Once your sketch feels solid, you’re ready for inking the stage where your drawing gains clarity and power.
Tools Recap
- Traditional: Micron pens (0.3 mm for details, 0.5–0.8 mm for outlines).
- Digital: Pressure-sensitive brush in Clip Studio Paint or Procreate.
Techniques
- Line Weight Control:
Thicker lines = shadows or foreground edges. - Thinner lines = inner details like facial features or folds.
- Flow of Energy:
Naruto’s character is full of emotion. Don’t make your lines stiff — draw from the shoulder, not the wrist. - Overlap & Depth:
Use line thickness to separate overlapping parts (e.g., hair over headband, jacket over neck). - Simplify:
Avoid over-detailing folds or textures. Anime style thrives on clarity, not clutter.
Pro Lesson: Professionals ink in passes first large contours, then mid details, then small accents. Don’t try to finish every detail in one go.
Step 7: Coloring Naruto (Markers or Digital)
Coloring brings life and this is where most beginners either shine or struggle. Let’s simplify it.
Base Colors
| Element | Hex Code (Approx) | Description |
| Hair | #FFD15C | Warm blond |
| Skin | #F7CBA5 | Light peach tone |
| Jacket (Main) | #F97C1F | Bright orange |
| Jacket (Blue parts) | #243E8E | Deep navy |
| Pants | #243E8E | Same navy tone |
| Headband cloth | #5B5B5B | Cool gray |
| Headband metal plate | #C8C8C8 | Light silver |
| Sandals | #20274F | Dark indigo |
Marker Technique (Traditional)
- Start with the lightest color and layer darker tones gradually.
- Use small circular strokes for smooth blending.
- Add warm shadows under the chin, under collar, and beneath sleeves.
- Use a white gel pen for highlights on hair and metal parts.
Digital Technique
- Flat base colors Shadows (multiply layer) Highlights (add layer).
- Avoid “airbrush glow” unless stylistically needed. Naruto’s world uses crisp cell shading.
- Use hue shifts (orange red-orange) for richness.
Color Psychology Note: Naruto’s orange jacket wasn’t random. Creator Masashi Kishimoto chose it deliberately to symbolize brightness and optimism in a dark world that reflects that emotion in your shading energy.
Step 8: Troubleshooting Common Mistakes
Even experienced artists fall into these traps:
| Mistake | Cause | Fix |
| Head looks too big | Wrong proportion (especially ¾ view) | Re-measure using “head count” method — 5.5 heads tall |
| Hair looks flat | Same spike length and direction | Add varied lengths, overlap, and shadows |
| Face looks off | Misaligned features | Always draw center and eye guide lines first |
| Colors muddy | Over-blending with markers | Layer gradually, let each tone dry before blending |
| Inking too thick | Heavy pressure | Use light wrist, build line weight gradually |
| Expression lifeless | Copying static image | Think emotion first why is he feeling this way? |
Pro Tip: Keep a “failure sketchbook.” Every flawed drawing becomes a reference for what not to repeat. Professionals learn faster this way.
Step 9: Publishing & Sharing Your Naruto Art
Drawing Naruto is one thing. Sharing it safely and effectively is another.
Fan Art & Copyright Basics
Naruto is owned by Shueisha / Masashi Kishimoto / Studio Pierrot. You can share fan art non-commercially on social platforms (Instagram, DeviantArt, ArtStation) if you:
- Credit the character’s creators.
- Avoid selling prints or merch unless it’s transformative (parody, original style).
If you plan to monetize, make sure your art is:
- Distinctive reinterpretation (e.g., realistic Naruto, mash-ups, chibi crossover).
- Sold as fan-inspired art, not official character art.
Platform Tip: Pinterest and YouTube Shorts currently give strong reach for art tutorials. Add process videos with captions like “How I drew Naruto step by step” — they perform exceptionally well for discovery.
Step 10: Advanced Variations (For When You’re Ready)
Once you’ve mastered the basics, challenge yourself with these styles:
Chibi Naruto
Big head, tiny body exaggerate emotion and simplicity. Focus on smooth, round lines.
Realistic Naruto
Use real facial anatomy references while keeping symbolic features (hair spikes, whiskers). Great for portfolio diversity.
Dynamic Battle Poses
Reference Naruto’s Rasengan stance. Use diagonal action lines and foreshortening.
Mixed Media
Combine ink outlines with watercolor or digital textures for hybrid aesthetics.
Pro Challenge: Redraw the same pose in three styles: anime, semi-realistic, and chibi. Compare how each communicates emotion differently.
Step 11: 12 Compact FAQs
1. How long does it take to draw Naruto as a beginner?
Usually 45 – 90 minutes depending on detail.
2. What pencil grade is best for sketching?
Start with HB or 2H for light structure, then 2B for darker outlines.
3. Should I color before or after inking?
Always after wet markers or digital brushes can smudge un-dried ink.
4. Why do my eyes look unbalanced?
Recheck the vertical guideline; the far eye should be slightly smaller in ¾ view.
5. Can I trace to learn?
Tracing can help understand proportions, but redraw freehand afterward to retain learning.
6. Which app is best for anime art?
Procreate for iPad, Clip Studio Paint for PC, Krita for free users.
7. How can I make my art look more “anime”?
Simplify shadows, use expressive eyes, and consistent line thickness.
8. What brush size for line art?
Depends on canvas, but generally 0.5–1.2 px digital or 0.3–0.8 mm pen.
9. Should I draw the Leaf Village symbol freehand?
Yes, but lightly pencil first; symmetry matters.
10. Can I post my Naruto fan art on Instagram?
Yes, credit Kishimoto & Shueisha, and tag as fan art.
11. What’s the best way to improve fast?
Draw daily for 30 minutes, focus on one skill each week (e.g., eyes, hands).
12. How do pros make lines so smooth?
They draw from the shoulder, not wrist practice long confident strokes.
Step 12: Bringing It All Together Final Thoughts
Think of every drawing as your next “training arc.” You’ll mess up, maybe Naruto’s eyes won’t match, maybe his headband looks off. That’s normal. Every professional anime artist started there.
Drawing Naruto teaches far more than anatomy or shading; it teaches patience, structure, and self-belief, the same qualities that define him as a character.
So, start today. Grab your pencil, open your sketchbook, and commit to your first imperfect Naruto. When you finish, compare it to your next one a week later you’ll see visible progress.
As Naruto himself would say:
“If you don’t like the hand that fate’s dealt you, fight for a new one.”
Final Word: You now have a full-spectrum framework for drawing Naruto from blank page to colored masterpiece. The next step is practice and persistence.
When you share your drawing online, tag it #NarutoFanArt (for discoverability only, not hashtags in text body) and remember, every artist starts somewhere.
Your only mission now: Believe it!
By now, you know exactly how to draw Naruto Uzumaki step by step — from the first circle to the final color. Keep practicing, and you’ll see your skills sharpen faster than you think.