How to Draw Batman Like a Pro: The Ultimate Step-by-Step Guide
Drawing Batman is a fast path to learning figure construction, lighting, and storytelling. This guide teaches three beginner-friendly styles. You will learn basic shapes, facial features, cape dynamics, and shading. The article includes six step-by-step image placeholders you can replace with your own images. By the end you will be able to draw a recognizable Batman in under one hour. You will also get a 30-day practice plan, troubleshooting tips, and real cases from beginner artists who improved fast.
Why drawing Batman is a great learning project
Batman blends clear shapes, strong silhouette, and dramatic lighting. He forces you to practice proportion, expression, and costume detail. These elements accelerate skill growth faster than drawing random objects. If you want structured practice that stays fun, Batman works perfectly.
Personal note: my first Batman drawing looked like a lopsided mask. I kept going. After two weeks of short daily sketches, my inking and shading improved a lot. That growth came from repeating the same subject with focused practice.
What you need to start
Beginner setup. Keep this list simple and affordable.
Essential physical tools
- Sketchbook, A4 or A5
- Pencils: HB, 2B, 4B
- Erasers: kneaded eraser and vinyl eraser
- Blending stump or tissue
- Fineliner pen 0.3 or 0.5
- Sharpener
Optional digital tools
- iPad with Procreate
- Wacom Intuos or similar tablet
- Photoshop for final touch ups
Brands I recommend
- Staedtler Mars Lumograph pencils
- Faber-Castell 9000 pencils
- Sakura Pigma Micron pens
- Prismacolor or Copic markers for color
- Procreate and Apple Pencil for digital sketching
Why these tools. The graphite range covers soft to hard marks. Kneaded erasers lift tone without smudging. Fineliners help lock contours for scan and color.
You will get:
- Six step images to add to your tutorial. Each image maps to an exact step.
- Three styles: chibi, comic, and realistic.
- Practice routines and a 30-day challenge.
- Troubleshooting and common mistakes.
- FAQ for voice search and quick answers.
Start with basic shapes
draw a circle for the head and simple ovals for the torso and hips. These shapes let you control proportion and pose.
How to do it
- Lightly draw a circle for the head. Add a vertical center line and a horizontal eye line.
- Below the head draw an oval for the chest. Draw a smaller oval for the pelvis.
- Connect head to torso with a simple neck line. Add straight lines for limbs.
- Keep all lines loose. This is a planning stage.
Why it matters
When you start with shapes, you avoid proportional mistakes. Many beginners tighten lines too early. The shapes guide anatomy and pose.
Personal tip: spend five minutes on gesture lines. They save twenty minutes of fixing later.
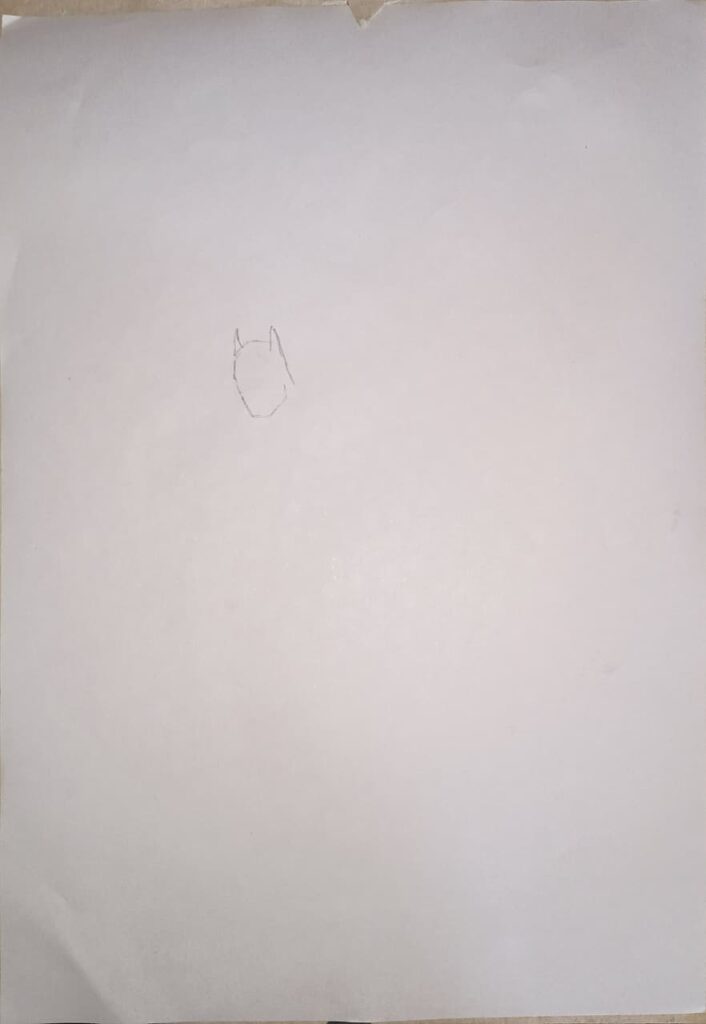
Build the face and cowl
Short answer: sketch the jaw, mask openings, and ear points. Make the eyes narrow to convey Batman’s brooding expression.
Details
- Use the horizontal eye line to place eyes. Batman’s eyes are narrow white slits in many comic styles.
- Draw a strong jaw under the circle. The jaw anchors the cowl.
- Add two pointed ear shapes on top of the head circle. They may be short or long depending on the style.
- Draw the nose as a simple wedge under the eye line. Avoid too much detail at first.
Shading notes
Shade around the eyes and under the brow to create a brooding look. Use HB to block tone and 4B for darker shadow.
Case study 1 Maya, beginner to confident in 3 weeks
Maya practiced only the cowl for ten minutes each day. She moved from shaky lines to confident shapes. Her final inking felt stable because her structure work improved.
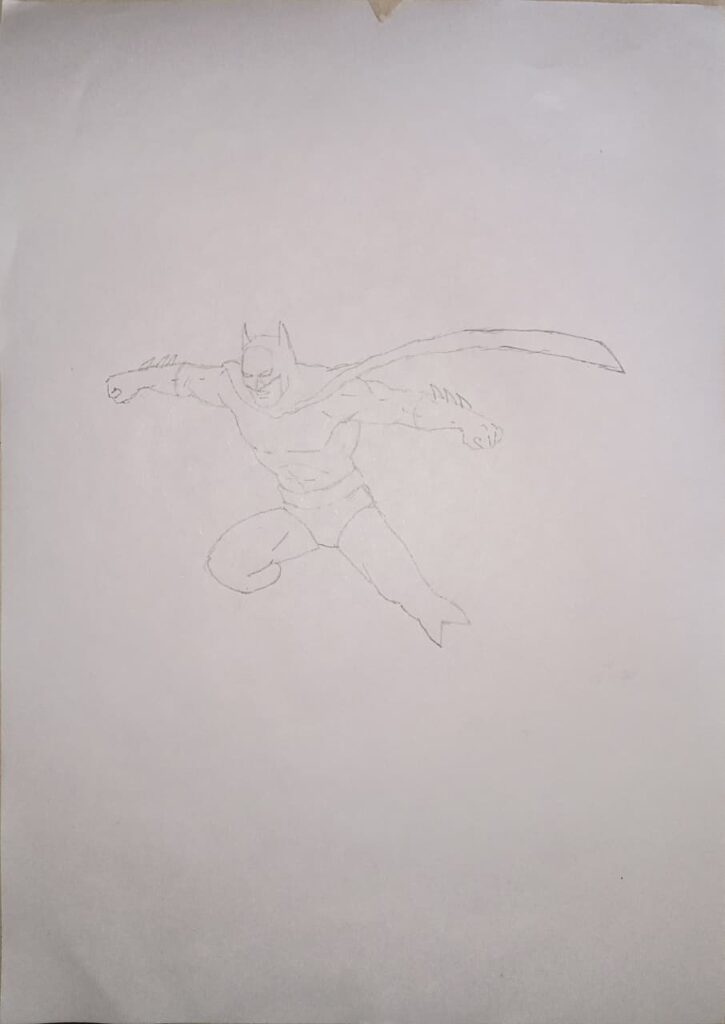
Sculpt the torso, emblem
keep the torso simplified as a tapered oval and place the emblem at the chest center.
How to place elements
- Torso: draw a taller oval and divide it with a horizontal chest line.
- Emblem: sketch a bat silhouette inside an oval or as a negative shape.
- Belt: draw a strip across the lower torso. Add compartment squares for gadgets.
Proportion tips
- Shoulder width depends on style. Classic comic Batman has broad shoulders. Chibi Batman has narrow shoulders.
- Keep the emblem size moderate. Too large it reads like a sticker. Too small and it loses presence.
Tool note
Use a light 2H or HB to block these areas. Save the 4B for deep shadows.
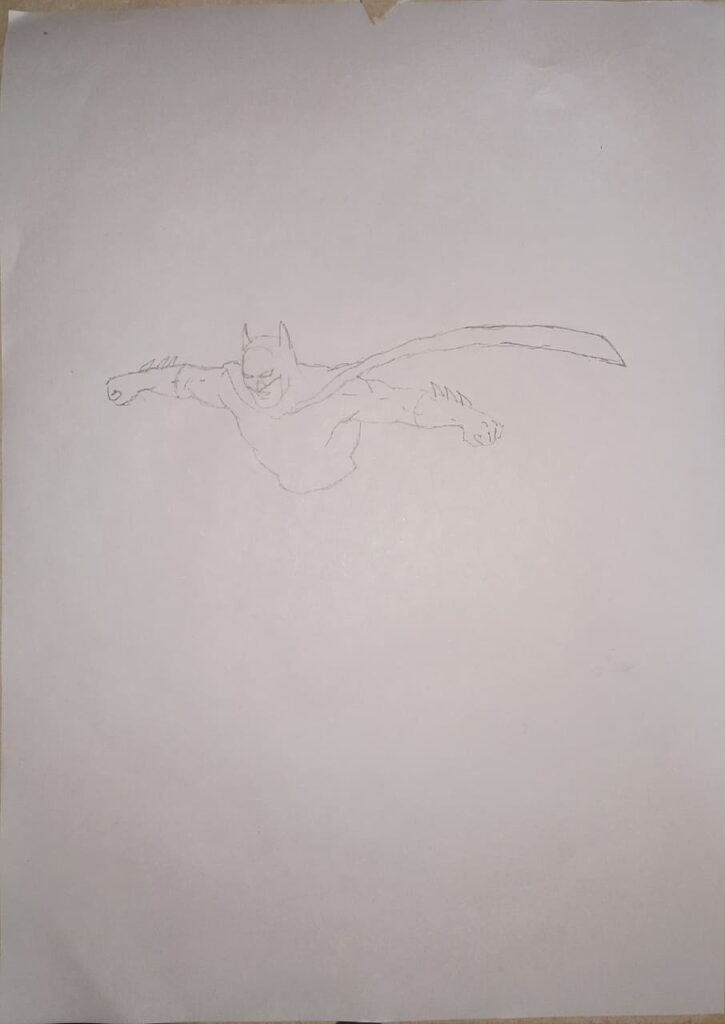
Draw the cape and dynamic pose with belt
Short answer: decide on a motion line and fold the cape around that line.
How to understand cape motion
- A cape follows the body’s motion and airflow. Draw a long sweeping curve from the shoulders.
- Use parallel folds to show layers. Crease lines near the shoulder show weight.
Practical steps
- Draw a flow line that shows how the cape moves.
- Add large fold shapes that follow the curve.
- Keep the edge of the cape sharp in silhouette to maintain a strong read.
Example poses
- Standing stoic: cape falls symmetrically.
- Gliding: cape billows back in long waves.
- Crouch: cape wraps around the knees with small folds.
Troubleshooting
Avoid random zigzag folds. Anchor folds to body motion.
Case study 2 — Ravi’s cape problem and fix
Ravi drew messy folds that confused the silhouette. The fix was a single flow line. He simplified folds to two layers and the cape read clearly.
Ink and refine linework
Short answer: pick the lines you want to keep and ink them cleanly. Use thicker outer lines for silhouette.
Inking process
- Start with a 0.5 or 0.3 fineliner. Trace the confident construction lines only.
- Vary line weight. Thicker lines on the outer contour add depth.
- Use cross-hatching or stippling for texture only where needed.
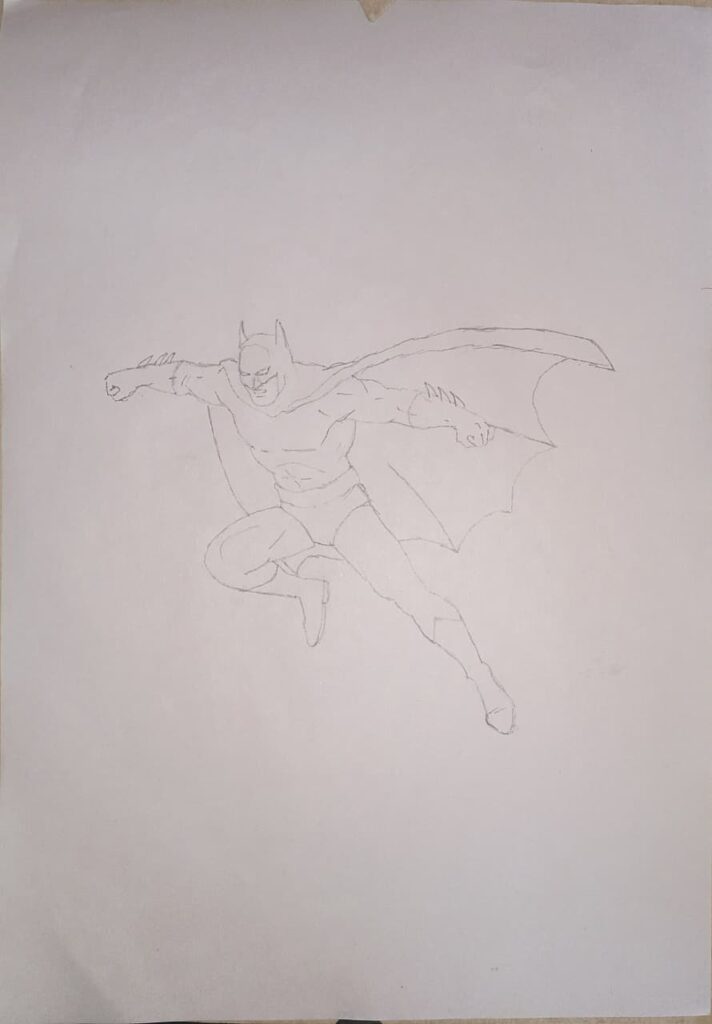
Common mistakes
- Inking every pencil line. This keeps the drawing busy.
- Using one uniform line weight. Varying weight increases clarity.
Digital tip
If you ink digitally, use vector-like stabilizers and a pressure sensitive brush for natural weight.
Shade, texture, and highlight
Shading steps
- Choose a light source. Top left or top right work well for dramatic effects.
- Block midtones with HB or 2B. Add darks with 4B.
- Use blending stumps to soften gradients on the cape and cowl.
- Add highlights by lifting graphite with a kneaded eraser.
Techniques explained
- Hatching: parallel lines to build tone.
- Cross-hatching: layered lines for denser tone.
- Smudging: creates smooth gradients but loses texture.
- Erasing for highlights: best for reflected light on the cowl.
Tools for shading
- Blending stump for transitions.
- Tortillon for tight areas.
- White gel pen for final white highlights.

Case study 3 Lina’s shading leap
Lina used only hatching for two months. She added a blending stump and her shading smoothed out. Her contrast improved and her Batman looked more three dimensional.
Three stylistic routes for beginners
Short answer: try chibi, comic, and realistic styles. Each teaches different skills.
- Chibi Batman
- Teaches simplification and expression.
- Big head, short body, simple emblem.
- Good for thumbnails and child friendly work.
- Teaches simplification and expression.
- Comic style
- Focus on strong silhouette and bold line weights.
- Practice anatomy and dynamic poses.
- Use pen inking and moderate shading.
- Focus on strong silhouette and bold line weights.
- Realistic sketch
- Emphasize tonal values and texture.
- Practice muscle structure and subtle light.
- Use range of graphite and blending tools.
- Emphasize tonal values and texture.
Which to pick
Start with chibi to build confidence. Move to comic for composition. Try realistic to develop shading.
Troubleshooting common mistakes and quick fixes
Short answer: most beginners face proportion, perspective, and shading errors.
- Proportion errors
- Fix: step back, check head count. Count how many head heights from top of head to pelvis.
- Fix: step back, check head count. Count how many head heights from top of head to pelvis.
- Facial asymmetry
- Fix: flip the drawing or view in mirror to spot imbalances.
- Fix: flip the drawing or view in mirror to spot imbalances.
- Flat cape
- Fix: define a light source and add fold shadows.
- Fix: define a light source and add fold shadows.
- Overworked shading
- Fix: lift tone with kneaded eraser. Work from light to dark.
- Fix: lift tone with kneaded eraser. Work from light to dark.
- Stiff poses
- Fix: redraw gesture lines and exaggerate motion.
- Fix: redraw gesture lines and exaggerate motion.
Practical habit
Keep an erasable underdrawing and avoid heavy marking until form feels right.
A 30-day Batman drawing plan for beginners
Short answer: practice high frequency, low duration sketches.
Daily pattern (20–30 minutes)
- Day 1–7: Gesture and shapes. Ten 1-minute gestures, five 5-minute sketches.
- Day 8–14: Faces and cowls. Ten 5-minute mask studies.
- Day 15–21: Torso, emblem, belt. Five 10-minute anatomy sketches.
- Day 22–27: Cape motion and poses. Ten 3-minute dynamic sketches.
- Day 28–30: Final pieces. One full drawing each day with inking and shading.
Tracking progress
Save each day’s best sketch in a folder. Compare week to week.
Community feedback
Post weekly on Reddit r/learnart or Discord art servers. Request one specific critique point.
Tools compared and honest recommendations
Short answer: choose tools that match your budget and goals.
Graphite pencils
- Staedtler: reliable, good HB set.
- Faber-Castell 9000: smooth range, great for shading.
Erasers
- Kneaded eraser: lifts graphite without tearing paper.
- Vinyl eraser: cleans hard marks.
Inking pens
- Sakura Pigma Micron: archival and precise.
- Copic Multiliner: refillable and consistent.
Digital
- Procreate: excellent for beginners and pros.
- Photoshop: best for post production.
- Wacom Intuos: budget friendly tablet.
Marker coloring
- Prismacolor: rich pigments.
- Copic: industry standard but pricey.
How I use them
For sketches I favor pencil sets from Faber-Castell. For final inks I use Micron pens. For quick color demos I use Prismacolor markers.
Legal and ethical note about copyrighted characters
drawing Batman for practice is fine. Avoid commercial uses of copyrighted designs without permission.
Guidelines
- Personal practice and fan art are generally allowed.
- If you plan to sell prints with the Batman logo, check DC Comics licensing.
- Transformative works may be safer but still risky for commercial sale.
FAQ direct, voice search optimized answers
- How do I draw Batman for beginners?
Start with basic shapes. Sketch a circle for the head and ovals for the chest and hips. Add simple limb lines. Refine a cowl and cape in later passes. - What pencils should I use for shading Batman?
Use HB for layout, 2B for midtones, and 4B for darks. A kneaded eraser helps lift highlights. - How do I draw Batman’s cape realistically?
Choose a flow line. Add large folds that follow that line. Shade edges for depth and use highlights for creases. - Can I draw Batman digitally with an iPad?
Yes. Use Procreate and an Apple Pencil. Start with a low opacity underdrawing and refine on separate layers. - How long does it take to draw a good Batman sketch?
A basic sketch can take 15–30 minutes. A refined, inked, and shaded piece can take 1–3 hours. - How do I fix bad proportions?
Measure with head units. Check shoulder width and limb length against the head size. Redraw the gesture if needed. - Is tracing bad for practice?
Tracing helps understand lines but do not rely on it. Trace once to learn then redraw freehand. - What are common beginner mistakes?
Tightening too early, inconsistent silhouette, poor light source choice. Use construction shapes to avoid these. - How can I make Batman look dramatic?
Use high contrast lighting from a single source. Add backlighting or moonlight for cinematic effect. - Where can I get feedback on my drawings?
Reddit r/learnart, ArtStation critiques, and Discord art servers give constructive feedback. - How do I draw the bat emblem accurately?
Sketch an oval and draw a symmetric bat silhouette. Use a ruler for symmetry if needed. - Can AI help generate references?
AI can make reference images. Use responsibly and do original drawing work from those references.
Final tips and next steps
- Save a master folder with your six step images and multiple versions.
- Practice five minutes of gesture work each day.
- Post weekly for feedback. Ask for one focused critique.
- Try one full inked drawing every two weeks to build portfolio pieces.
Conclusion
Drawing Batman teaches proportion, lighting, gesture, and narrative in one subject. Start simple with shapes and a plan. Use the six step images to guide beginners visually. Follow the 30-day routine and you will see clear improvement. Share your work with a community. Learning to draw the Dark Knight is also learning to tell a story with line and tone.
What to do next